• portfolio
  • about
  • contact
  • shop
Menu

Lucy Alexander Ceramics

Handcrafted Pottery
  • portfolio
  • about
  • contact
  • shop
×
Photo by Lucy Alexander

Photo by Lucy Alexander

Citrus Pulled Pork

Claudia Alexander November 2, 2018

The Del Mar Racetrack was a colorful place to work when I was in my early twenties. Most of the people I worked with were there to bet on the horses, or as they put it, “help feed” them. Their morning began by marking up the day’s racing form. It was hard not to get caught up in the thrill of the win. You could feel the excitement rise before each race as the clock ticked closer and closer to post time. There were lines of anxious people at the windows trying to get their bets in before the bugle call. The roar would reach a crescendo and suddenly end. As the winner was announced you could see a cloud of losing tickets being thrown in the air. One day a carafe of hot coffee spilled down the back of my leg. I was sent to the infirmary. As I sat there with an ice pack on my leg, I watched my horse come in. I won the daily double that day, it was the first time I had bet on a horse and not only that I got to watch the whole race from a comfortable bed while screaming at the TV. That was it—I was hooked!

One of the best places to eat at the track was the backside. That was where the horses were boarded and the jockeys spent most of their day, as well as the exercise people, and all the many other people who took care of the horses. The place was noisy, dusty, and constantly busy, but the food was fresh and mostly to order. The smell as you walked in the door would be a mixture of hay, sawdust, leather boots and hats, warm tortillas, chorizo sausages, roasted and grilled meats and peppers, refried beans, and strong coffee. One of my absolute favorites was a plate of roast pork with black beans, rice and freshly made tortillas. That dish satisfied all my cravings of salty, crispy meat, grilled onions and peppers, with hints of citrus and fresh cilantro sprigs in every bite. This dish brings back those memories. Enough for a perfect autumn dinner and tacos the next day. Marinate it overnight and then roast it for a couple hours. The house will smell fantastic and you will be hard pressed to wait for everyone to get to that table before you dig in.

Photo by Lucy Alexander

Photo by Lucy Alexander

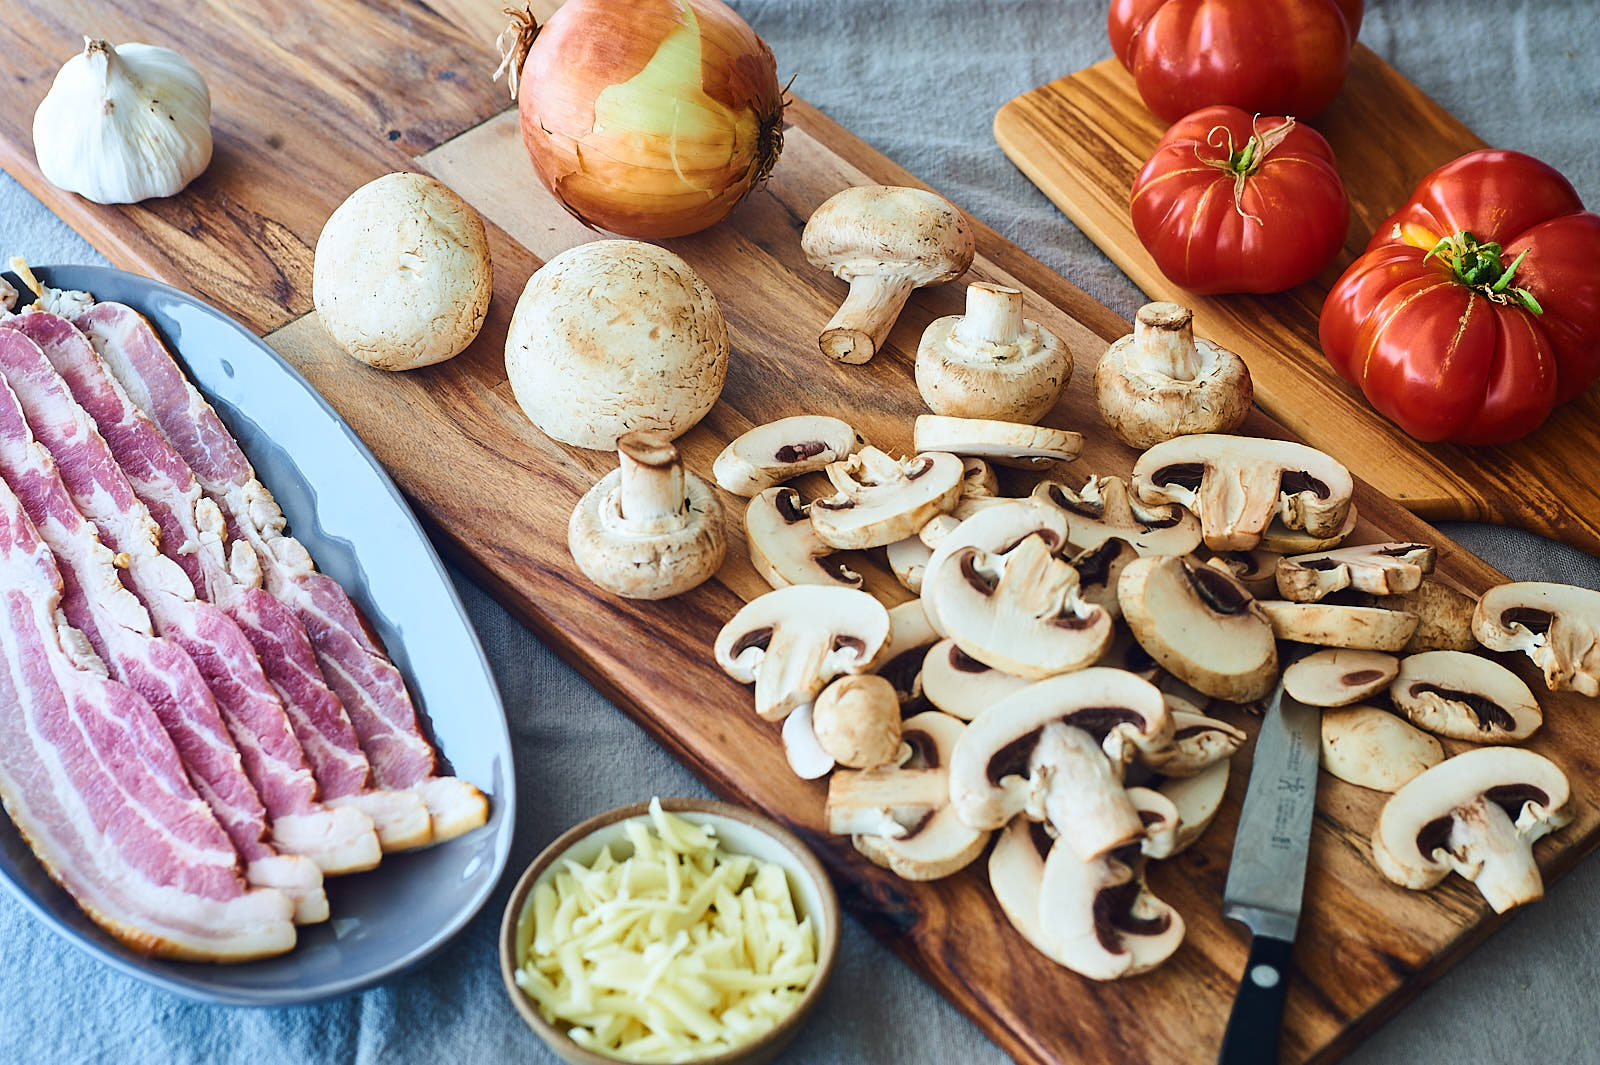
In a mortar and pestle add the garlic, salt and cumin. Grind to a paste and then add the marjoram and oli. Blend the mixture until combined. Set aside. Place the pork in a nonreactive container that fits the pork comfortably. Using your fingers, rub the garlic mixture all over the pork, massaging the mixture into the roast. Juice all the citrus and pour it over the pork. Cover and place in the fridge overnight.

Photo by Lucy Alexander

Photo by Lucy Alexander

Citrus Pulled Pork

adapted from Steve Sando’s cookbook Heirloom Beans

  • 2 each oranges, lemons & limes

  • 1- 3lb. boneless pork shoulder

  • 2 onions

  • 4 medium cloves garlic

  • 2 teaspoons salt

  • 1 teaspoon each cumin and marjoram

  • 2 tablespoons of olive oil

Photo by Lucy Alexander

Photo by Lucy Alexander

Preheat the oven to 400°

Thinly slice the onions and place them in the bottom of a casserole dish large enough to hold the pork. Take the pork out of the marinade and place it on top of the onions fat side up. Save the marinade. Cook for 40 minutes with the lid off. Turn the pork so that the fat side is on top of the onions and cover and reduce the heat to 350°. Cook the roast for an hour. Check the roast; if there is any liquid in the bottom pour it off and place the pork back in the oven with the lid on. Place the marinade in a saucepan and simmer about ten minutes. Add a ladle of marinade over the pork replace the lid and cook another two hours. Check every so often and add a bit more marinade if needed.

Photo by Lucy Alexander

Photo by Lucy Alexander

Serve with black beans and tortillas. Rancho Gordo’s Midnight black beans are the best! Presoak 4 hours and then pressure cook for 20 minutes. Yum.

Written by Claudia Alexander

Dinner plate from hudsongracesf.com

Photo by Lucy Alexander

Photo by Lucy Alexander

In Recipe
1 Comment
Bison Sliders0774.jpg

Tomato Cheese and Mushroom Tart

Claudia Alexander October 19, 2018

I already told you the story about the first time I made a cake. We had to eat it in chunks because it split into three pieces as I iced it. I never even got that far with my pie. I threw away the dough and ate the filling. You can buy frozen pie crusts in a pinch, and they are not too bad, but it is much more satisfying not to mention tastier to make it yourself.

Bison Sliders0765.jpg

Preheat oven to 375°

Tomato Cheese and Mushroom Tart

Filling:

  • ¾ lb mushrooms sliced

  • 2 cloves garlic

  • ½ teaspoon thyme

  • 1 tablespoon olive oil

  • 3 slices of bacon (optional)

  • 1 onion thinly sliced (about 1½ cups)

  • 1 tablespoon butter

  • 2 tablespoons ½ & ½

  • 1 teaspoon dijon mustard

  • 2 medium tomatoes sliced

  • 1 cup grated

  • 1 cup grated cheddar cheese

Autumn is the season for savory pies and tarts. Use up some of those leftover tomatoes that are still clinging to the vines in your back garden, and bring this tart along to your next potluck. It would also be a welcome addition to your Thanksgiving table. You can make the dough and the filling the day before and just bake it the day you want to serve it. This tart travels well and is delicious for breakfast the next day, but you probably won’t have to worry about leftovers.

Make the dough first.

Pâte Brisée

  • 1 ½ cups of all purpose flour

  • ½ cup cake flour

  • 1 teaspoon salt

  • 8 ounces of cold unsalted butter cut into cubes (2 sticks)

  • ½ cup ice water

In a medium sized bowl whisk flour and salt. Add butter and mince with your fingers until you get all the small pieces of butter broken down and the flour mixture has the consistency of coarse corn meal. Add half the water and gently pull the dough together with your fingers. As the mixture starts to form a ball add the rest of the water. Mold into a disk, wrap it in plastic wrap and rest in the fridge for one to two hours. While the dough is resting make the filling.

Bison Sliders0794.jpg

Position oven rack in the middle of the oven. Line baking sheet with parchment paper. Place mushrooms on paper and toss with olive oil and thyme. Spread out in a single layer and place in the oven for 25 minutes until the mushrooms have lost all their liquid and are fragrant.

While mushrooms are cooking, place the bacon in a medium frying pan and cook until crisp. Drain on a paper towel and when cool, tear into bite-sized pieces; set aside. Drain all but 1 teaspoon of bacon fat from pan and add the butter and sliced onions. Sweat the onions covered at low heat until translucent and wilted—about 25 minutes. Take off the heat and add the bacon, mushrooms, ½ & ½, and mustard. Stir to blend, then set aside to cool.

Roll out the dough to fit a 10-inch tart pan with removable bottom. Let the dough hang over the side of the pan about ¼ inch. Spread half the grated cheese on the bottom of the dough and spoon the bacon mushroom mixture over the cheese. Sprinkle the remaining cheese over the top of the tart and cover the top with the sliced tomatoes. Fold the edge of the dough back on to the edge of the tomatoes and crimp the dough to make an attractive border along the edge of the tart. Bake for about 50 minutes, until the top is golden. Serve warm or at room temperature with a green salad.

Bison Sliders0793.jpg
In Recipe
1 Comment
Chicken_Pasta_Mustard0655.jpg

Chicken and Olive with Pasta in Mustard Sauce

Bare Stone September 23, 2018

Yes, summer is over, but here in California we are lucky enough to be able to grill all year long. I love barbeque especially barbequed chicken, and this week’s recipe is a great way to use up those last couple of pieces that don’t get eaten. The combination of chicken and pasta isn’t as common as beef, pork, or lamb with pasta, but it works really well here—especially with the addition of the mustard sauce. You probably have many of the other ingredients for this recipe in your pantry already, so even though the name of the recipe sounds fancy, it can easily become part of your weekday dinners.

Photo by: Lucy Alexander

Photo by: Lucy Alexander

A couple of things to keep in mind when you are cooking this dish. I like to use fusilli, chiocciole or penne pasta because the shape of the pasta catches the sauce and so in each bite you get all the different textures and flavors. Secondly, when you add the mustard to the broth, turn the heat down a bit, stirring every so often so that the mustard doesn’t curdle. Lastly, you can substitute leftover roast chicken or even rotisserie chicken, but leftover barbeque chicken is my favorite.

Chicken and Olive with Pasta in Mustard Sauce

Adapted from The All Seasons Cafe

  • 1 ½ -2 cups of diced cooked chicken

  • ¼ cup olive oil

  • 4 tablespoons of quartered greek olives

  • 2 tablespoons of diced sun-dried tomatoes

  • ¼ of a red onion diced( about ¼ cup)

  • 2 cloves of garlic minced

  • 2 tablespoons of dijon mustard

  • 3 cups chicken broth

  • 1 lb cooked tubular pasta  (see above)

  • Salt and pepper to taste

Photo by: Lucy Alexander

Photo by: Lucy Alexander

Photo by: Lucy Alexander

Photo by: Lucy Alexander

Pour the olive oil into a large sauté pan over medium heat. Add red onion and garlic, turn heat down, and cover. Steam for 10 minutes or until soft, and watch that it doesn’t burn. Turn heat up slightly and add the olives, tomatoes; cook for a minute until fragrant, then add the mustard and chicken stir to mix. Cook another minute or two and add broth. Cover and cook over medium heat for 15 minutes, taste and add salt and pepper if needed, add pasta, and combine. Turn off heat and let sit covered for 5 minutes. Serve with a sprinkling of grated parmesan cheese over the top.

Written by: Claudia Alexander

Photo by: Lucy Alexander

Photo by: Lucy Alexander

In Recipe
Comment
Photo by: Lucy AlexanderMarble paddle by Hudson Grace

Photo by: Lucy Alexander

Marble paddle by Hudson Grace

Fig and Raspberry Galette

Bare Stone September 13, 2018

One bite of this galette with sweet figs and the slightly tart raspberries will make you a fan too. This galette won’t last long and I guarantee you won’t throw it away either.

Read More
In Recipe
Comment
Photo by: Lucy Alexander

Photo by: Lucy Alexander

Heirloom Tomato, Melon and Arugula Salad

Claudia Alexander September 6, 2018

  Slicing, dicing, grating or sautéing are always more enjoyable with a little music playing in the background. Of course when it is Aretha Franklin, it isn’t exactly background music. “You’re a no good heartbreaker, you’re a liar, and you’re a cheat. I don’t know why I let you do these things to me…”  What ever happened to that gold suede mini skirt?  No never mind, I am going to turn Aretha up to 8, and sing at the top of my lungs. Of course dancing around the kitchen could make dinner a bit later than usual— but who cares, it’s Aretha!  “Baby baby baby sweet baby there’s something that I just got to say…” Of course it is important to pay attention when cutting vegetables, so as not to end up on the “Chain, chain chain, chain of fools…”. Put the knife down when it’s time to shimmy around the kitchen island like you did at that party…  “What you want baby I got it, what you need you know I got it…” Don’t get carried away and make a salad for ten people when it is just the two of you. “You

better think, think think  …” don’t forget to set the timer or that meat will be overcooked. “Kiss me once again, don’t you never never say that we’re through…”  Set the table and pour the wine. “You make me feel, you make me feel, you make me feel like a natural woman...:” OK, it is time to reluctantly take off my dancing shoes and sit down to eat dinner. BUT before I pick up that fork I take a moment to thank Aretha Franklin for all the times she lifted my spirits and made me forget where I was, if only for that one song.  She did this for me many times over the years. Her voice soared to heights like no one else’s. I danced to her music at parties, sang along with girlfriends at the top of my lungs ( “R-E-S-P-E-C-T”), cried into my pillow over heartbreaks, to her songs. Music brings back memories of hard times as well as happy ones. As I have listened to her music over the past couple weeks many of those memories have come flooding back. Thank you Aretha Franklin, RIP.

It is the peak season for tomatoes and cantaloupe; they are plentiful and flavorful. Cantaloupe has a more dense texture than watermelon, and works well with the softness of the tomatoes and the creaminess of the burrata. What also makes this salad great is the fish sauce in the dressing. It gives a slightly salty flavor without the fishiness that anchovies can lend to a dressing. If you want, you can skip the arugula and serve the salad along with grilled chicken or steak. 

Tomato, Melon and Arugula Salad

Salad:

  • 4 large heirloom tomatoes cut into bite- sized chunks

  • ¼ cantaloupe skinned and cut into bite- sized chunks

  • ½ cup burrata cheese at room temperature

  • Thinly sliced red onion

  • 5 or 6 pickled cherries cut in half (optional)

  • 3 cups washed and dried arugula

Photo by: Lucy Alexander

Photo by: Lucy Alexander

For the dressing add all ingredients in a jar with a lid and shake until the mustard is incorporated. Set aside.

Into a medium bowl toss the tomatoes and cantaloupe with a tablespoon dressing. Let them sit for about 20 minutes. Then drain.

Arrange the dried arugula in a line down the middle of the platter.  Using about eight or ten pieces of tomato and cantaloupe, place them on top of the arugula. Arrange them so that the colors are not all the same. Add a dollop of burrata cheese, and then continue adding more tomatoes and cantaloupe. Sprinkle thin slices of red onion throughout. Repeat with the burrata, tomatoes, and cantaloupe until you get to the end of the bed of arugula. Top with the picked cherries. Drizzle the rest of the dressing over the salad and serve.

Written by: Claudia Alexander 

You can purchase the white platter and wooden bread board pictured above at Hudson Grace


Photo by: Lucy Alexander

Photo by: Lucy Alexander


Dressing:

  • 3 Tablespoons olive oil

  • 2 Tablespoons white wine vinegar

  • 2 teaspoons fish sauce (I use Red Boat)

  • 1 teaspoon Dijon scant

Photo by: Lucy Alexander

Photo by: Lucy Alexander

In Recipe
Comment
Capture One Catalog0155.jpg

Herb Roasted Spatchcock Chicken

Bare Stone August 20, 2018

Keeping chickens can be a satisfying hobby, but take my word for it and do not let your mother “help.” If you decide to jump in, give yourself permission to feel virtuous—after all you are now giving back to the land. You are an urban farmer! Chickens can be very accommodating. They will gobble up all kinds of kitchen waste—the end bits of veggies that you don’t put in your salad, old crusts of bread, leftover rice, or noodles; just don’t give them any leftover chicken...  They don’t need to be walked, they don’t bark, they love snails and bugs, and their poop is great fertilizer for your garden. An added benefit is of course all the fresh eggs. Walking out to the coop with a straw basket in hand searching for the hidden eggs can feel a bit like a scavenger hunt as you dig your fingers into a pile of straw, hoping to connect with a warm egg.

   Baby chicks are available at most feed stores in the spring; they usually start laying at around 6 months of age, but I didn’t go the traditional route. I went straight to the source, a chicken farm. I had heard that you could get chickens that were already laying eggs. The farm only kept them for a year and then sold them because the chickens’ production slowed down.  The idea of rescuing chickens from a chicken farm appealed to me. My rescue chickens would live out the rest of their lives in a clean coop with lots of room to scratch and explore and the occasional field trip, where they would be let out to explore beyond their coop and into our garden. Using aviary wire, we built a fence around an existing old wooden shed and put a couple shelves in the shed with straw-filled boxes for the chickens to lay their eggs in.  I got six chickens from the farm and brought them home, named them, and let them loose in their new home. I went down with my straw basket to collect eggs the next morning and I found one egg, but I never got another one. Weeks later , still no eggs, I lost two chickens to coyotes while

    home. I went down with my straw basket to collect eggs the next morning and I found one egg, but I never got another one. Weeks later , still no eggs, I lost two chickens to coyotes whilethey were out in the garden during the day. On top of that I discovered that rats were burrowing under the fence, attracted to the grain. Now I was feeding the chickens AND a couple families of rats! My friends thought I was crazy to put that much work into chickens that didn’t lay any eggs and “Claudia’s rescued chickens” became a running joke. Early the next year, I went out of town and my mother offered to house/chicken sit for me.  I later realized she had a hidden agenda. Coming home I drove up the driveway past the coop, I thought I saw some unfamiliar chickens. Too tired to stop, I went to the house and discovered Sally, Nora, Emily, and Jane plucked and cooked in plastic bags in my fridge. I was sad but soon had more eggs than I knew what to do with from their replacements.

This week's recipe isn’t a replacement for a chicken that stops laying eggs or for your chicken named Emily. This is just a fabulous, juicy, roasted chicken recipe. The main reason it is so juicy is that it calls for a spatchcocked a chicken. 'Spatchcock' is a specific term used for the way a chicken or game bird is cut. Taking out the backbone and flattening the bird on a cookie sheet, stuffing a mixture of cheese and herbs and lemon between the skin and the flesh, combined with the high temperature make this roast chicken moist on the inside and crispy on the outside.

Fabulous on its own, but also perfect served with a green salad and  baguette to soak up the juices left in the pan.

Capture One Catalog0036.jpg

Place the chicken on a cutting board breast side down. Holding on to the tail, slowly cut up one side of the backbone and then down the other side. Also clip off the tips of the wings. (I freeze all my chicken backs and tips for homemade chicken broth).

Cover a baking sheet with parchment paper. Place the spatchcocked chicken breast side up on top of the parchment paper, use both hands, palms down one on top of the other, and push down on the breast bone to crack the bone a bit so that the chicken lies flat.

Now gently pull the skin from the top of the breast away from the flesh. Making a pocket on either side of the breast bone, pull out and discard any fatty bits. Repeat on the top of the thighs down through the drumsticks as far as you can go again on either side, taking care not to tear the skin on the thigh, which can be a bit thin. You now have four pockets. Set aside.

Capture One Catalog0089.jpg

Herb Roasted Spatchcock Chicken:

Preheat oven 400°

  • 1 - 3.5/4 lb. whole chicken

  • 3 oz. mascarpone cheese scant (depending on the size of your chicken)

  • 2 teaspoons fresh oregano finely chopped

  • 2 teaspoons fresh flat leaf parsley finely chopped

  • ½ teaspoon salt

  • ½ teaspoon pepper

  • 2 minced cloves garlic

  • 1 lemon sliced into six pieces

  • 2 tablespoons olive oil

Capture One Catalog0063.jpg
 

Cheese Stuffing:

In medium bowl mix cheese, with minced garlic, herbs, ½ teaspoon of salt and ½ teaspoon of pepper and juice from one of the lemon slices.

Using a spoon, place a scoop of the mixture under the skin in both sides of the breast and both whole legs. Next, use your fingers on the outside of the skin to massage the filling around so that it covers most of the flesh. Continue until you have used up all the cheese mixture. Brush the bird with olive oil and then liberally sprinkle with salt and pepper and squeeze the last lemon slice over the entire bird. Tuck the rest of the lemon slices around the chicken and roast for 60-70 minutes until the bird is crispy and brown all over. Rest for ten minutes and then dig in.

Capture One Catalog0077.jpg

*Note:

When I tried to spatchock my first turkey a few years ago it was really hard. It took both me and my son who practically sat on the turkey to get it to lie flat. It is much easier with a chicken though, so do not give up! Make sure you have either a boning knife or sharp kitchen shears. BTW I always spatchcock my turkey now. It is never dry and takes much less time to cook.

Capture One Catalog0155.jpg
In Recipe
1 Comment
oct2017pottery0014 8.jpg

Summer Pasta

Bare Stone July 15, 2018

Basil has a very distinctive smell. At the checkout counter it never gets mistaken for cilantro or flat leaf parsley. Like many people, I love it, but there was a period of about 2 months that I really couldn’t tolerate it at all. I was almost seven months pregnant and twice a week I drove for about an hour down a windy mountain road to take classes at a local junior college. Around the bottom of the mountains  nestled farms that grew apricots, avocados, grapefruit, oranges, cabbages, and lettuces. Driving along through the fields of vegetables or orchards of trees on both sides of the road was very pleasant. The trees were laden with fruit, the occasional hawk perched on a fence, and when the trees were in bloom the smell was fantastic. I would roll down the windows and breathe deeply. That changed in early spring when they planted basil. The smell became so strong that it made me nauseous. I started to dread that part of the journey but there was no alternative route, and I wanted to finish these classes. After all I had a major deadline. I tried rolling up the windows, holding my breath, or distracting myself with music or books on tape. Pushing my old VW squareback past the fields as fast it would go with music blaring seemed to work the best. One morning just as I got to the bottom of the mountain, I heard a huge clunk as the rear axle hit the road, and I watched the back wheel of my car race past me heading down the road. I skidded to a stop. We found the runaway wheel more than a block away. After inspecting the back end of the car, the tow truck driver asked if I had heard anything before the wheel rolled past me. I shook my head.  When he put the key in the ignition the music was deafening; I didn’t say anything, his look said it all. Luckily for me the basil was harvested the following week.

This is a summer recipe. Great for a party—you can double the ingredients easily. It takes about ten or fifteen minutes in the morning to gather the ingredients in a bowl. Then push it to the back of the countertop and let it sit while you get on with your day. In the evening cook the pasta for ten minutes or so and voilà!  No oven involved and the stove only has to be on long enough to cook the pasta. Once it is cooked you toss it in a bowl with the room-temperature sauce and it just melts together. The smell of basil and garlic is mouthwatering. Everyone is marveling at you thinking you slaved all day over this dish.

Photo by: Lucy Alexander

Photo by: Lucy Alexander

Note:

The original recipe say to prepare the sauce two hours before, but I find that if I make it in the morning and leave it on the counter with a plate over it the flavors are more developed.

Also, I love garlic—but not raw. Since the sauce for this recipe isn’t cooked, I use roasted garlic oil( recipe below). You still get the flavor of the garlic but when it roasts in oil, it sweetens and mellows, I keep a jar on the door of my fridge at all times. It lasts forever and I find that I use it more and more on roasted veggies, salad dressings, or other pasta sauces. I encourage you to give it a try; you won’t be sorry.

Summer Pasta

adapted from the Silver Palate Cookbook

  • 6 medium sized tomatoes cut into ½-¾ inch chunks

  • 1/2 cup olive oil

  • 8 oz brie—cut off rind

  • ½ cup basil leaves cut into ribbons (make sure they are dry or the oil won’t stick)

  • 4 small cloves of minced garlic or 1 teaspoon of roasted garlic oil (recipe to follow)

  • I package of linguine (1lb)

  • Salt and pepper to taste

Directions:

In a large bowl place the tomatoes, olive oil, brie (torn into pieces), basil ribbons, garlic, ½ teaspoon of salt, and a couple grinds of pepper. Mix to incorporate and then leave the bowl on the counter with a plate over it to macerate.  (See note above.)

Bring a large pot to boil and cook pasta according to package directions. You want the pasta to be tender but still have a bit of tooth . While the pasta is cooking taste the sauce. Add more salt or pepper if needed. When the pasta is ready, quickly drain and toss with the sauce. Serve immediately.

Photo by: Lucy Alexander

Photo by: Lucy Alexander

Roasted Garlic Oil

  • 2 heads of garlic, cloves smashed and peeled

  • 1 ½ cups of olive oil

  • ½ teaspoon of salt

Preheat oven 325°

Place garlic cloves in a glass baking dish along with oil and salt, covering the garlic with oil. Depending on the size of your dish you might need a bit more oil. Bake about 30 minutes. Check after 20 minutes or so. You want the garlic to be golden but not brown.

Pour off  ¾ cup of the oil and save. This garlic-flavored oil can be used in many dishes, like salad dressing or over a mound of hummus.

Place the rest of the garlic along with the oil in a food processor and pulse 6 or 7 times until the garlic is a paste. Scoop the mixture into a jar and keep in the fridge. I use it for this recipe, roasted vegetables, pasta sauce, brushed over salmon, shrimp, burgers, or lamb chops. For any dish that I would usually add garlic to I use this garlic oil. It lasts for months.

Written by: Claudia Alexander

In Recipe
2 Comments
ClaudiasKitchen_Icecream3_LucyAlexander.jpg

Ice Cream Sandwiches

Bare Stone July 6, 2018

Strawberry Ice Cream

  • 4 egg yolks beaten

  • scant ¾ cup sugar

  • 1 cup 1% milk

  • a pinch of salt

  • 1 cup whipping cream

  • 2 cups strawberries

Put strawberries in a food processor and pulse until they are the texture of hot dog relish (if they are too big they will stick out of the ice cream sandwiches). In a medium bowl toss them with ¼ cup of sugar, and put the bowl in the fridge.

In a saucepan over medium heat combine egg yolks, ½ cup sugar, salt and milk. Whisk until the custard starts to thicken, about 10 minutes. Keep an eye on it so that it doesn’t burn.


Chocolate Waffle Wafers

  • 2/3 cup all-purpose flour

  • ¼ cup cocoa powder –optional (I use Guittard)

  • 1/4 tsp. salt

  • 2 eggs

  • 1/2 cup sugar

  • 4 Tbs. (1/2 stick) unsalted butter, melted

  • 1/4 cup milk

ClaudiasKitchen_Strawberries2_LucyAlexander.jpg

Transfer to a bowl and slowly add the cream to combine. When cool add the mixture to an ice cream maker and freeze according to the manufacturer’s instructions. Add the strawberries in the last five minutes.

ClaudiasKitchen_Icecream_LucyAlexander.jpg

Turn waffle maker on to #3 heat setting.

Mix flour, cocoa powder and salt in a medium bowl and set aside.

Whisk eggs and sugar in a large mixing bowl for a minute until it gets frothy and light lemon yellow. Gradually add flour mixture. When it is incorporated, add the butter and milk. Pour about ¼ cup of batter onto the waffle maker, close lid and cook for about two minutes.

Using tongs, lift the waffle off the griddle. Pour another batch of batter into your machine and close the lid. While the next one is cooking, cut the cooked waffle with a 2 ½" cookie/biscuit cutter (you will get three or four wafers out of each waffle). Repeat until you are out of batter. After the wafers are completely cooled, see the directions above for filling the wafer.

To read more click here

In Recipe
Comment
Older →

Search Posts


Featured Posts

Summary Block
This is example content. Double-click here and select a page to feature its content. Learn more
Featured
Jul 2, 2025
Cursus Amet
Jul 2, 2025
Jul 2, 2025
Jun 25, 2025
Pellentesque Risus Ridiculus
Jun 25, 2025
Jun 25, 2025
Jun 18, 2025
Porta
Jun 18, 2025
Jun 18, 2025
Jun 11, 2025
Etiam Ultricies
Jun 11, 2025
Jun 11, 2025
Jun 4, 2025
Vulputate Commodo Ligula
Jun 4, 2025
Jun 4, 2025
May 28, 2025
Elit Condimentum
May 28, 2025
May 28, 2025
May 21, 2025
Aenean eu leo Quam
May 21, 2025
May 21, 2025
May 14, 2025
Cursus Amet
May 14, 2025
May 14, 2025
May 7, 2025
Pellentesque Risus Ridiculus
May 7, 2025
May 7, 2025
Apr 30, 2025
Porta
Apr 30, 2025
Apr 30, 2025

Powered by Squarespace